はじめに
手書き文字認識(MNIST)による多クラス識別問題をやってみる。
前回に引き続きこの資料を基に理解していく。
MNISTとは
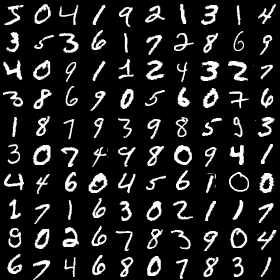
手書きの文字列を認識するもので、画像認識では定番と言えるテーマだ。
手書き文字の認識データは、機械学習の著名な研究者であるYann LeCun氏のwebsiteで公開しており、0-9のいずれかの数字が学習用、テスト用それぞれで60000枚と10000枚含まれている。
各数字画像の大きさは28×28ピクセルの単色画像で、RGBではなくGray-scaleの色空間となっている。
多クラス識別問題
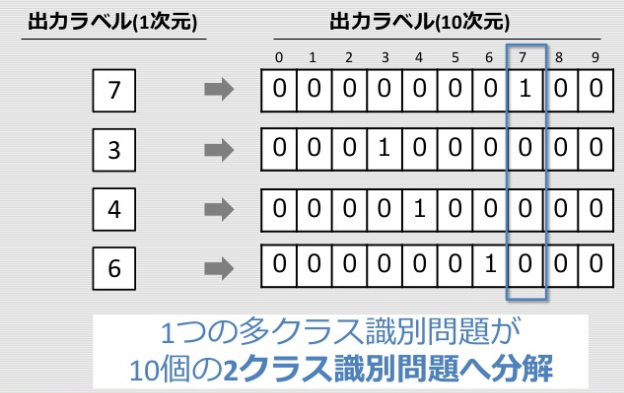
前回の八百屋の識別問題が、買えるか買えないかの2クラスの分類であったが、今回は手書き文字を0-9と多クラスの分類となる。
手書き文字認識

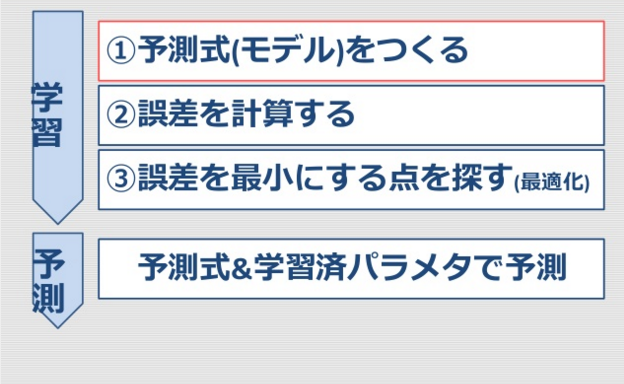
機械学習の流れ
one-hot ベクトル (one-of-K表現)
案1: ロジスティック回帰を拡張
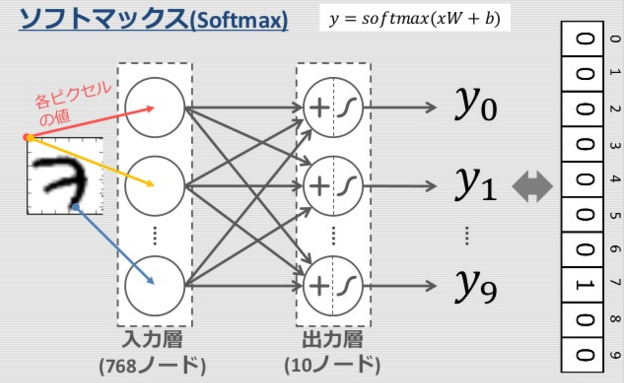
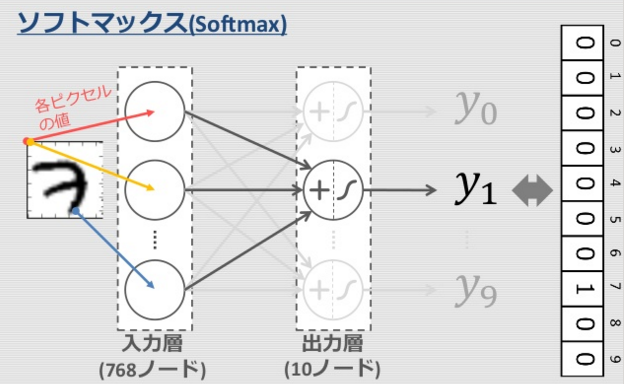
ソフトマックス関数と呼ばれており、シグモイド関数を多クラス問題に対応させた活性化関数である。
ソフトマックス関数を使うと出力層の各ユニットの和が1になります。つまり、出力値が各クラスである確率と見なせるようになります。
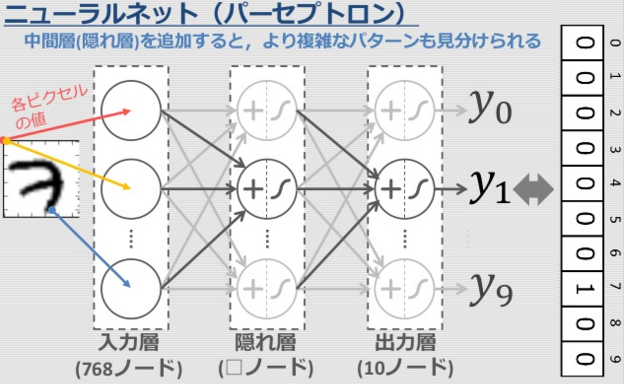
案2: さらに中間層を追加
1. 予測式(モデル)を記述
TensorFlowによる実装
# 入力変数と出力変数のプレースホルダを生成
x = tf.placeholder(tf.float32, [None, 784])
y_ = tf.placeholder(tf.float32, [None, 10])
# モデルパラメータ(入力層:784ノード, 隠れ層:100ノード, 出力層:10ノード)
W1 = tf.Variable(tf.truncated_normal([784, 100]))
b1 = tf.Variable(tf.zeros([100]))
W2 = tf.Variable(tf.truncated_normal([100, 10]))
b2 = tf.Variable(tf.zeros([10]))
# モデル式
h = tf.sigmoid(tf.matmul(x, W1) + b1) # 入力層->隠れ層
u = tf.matmul(h, W2) + b2             # 隠れ層->出力層 (ロジット)
y = tf.nn.softmax(u)                  # 隠れ層->出力層 (ソフトマックス後)

2. 誤差関数と最適化手法を記述
# 誤差関数(loss)
loss = tf.reduce_mean(tf.nn.softmax_cross_entropy_with_logits(u, y_))
# 最適化手段(最急降下法)
train_step = tf.train.GradientDescentOptimizer(0.01).minimize(loss)
# 正答率(学習には用いない)
correct_prediction = tf.equal(tf.argmax(y,1), tf.argmax(y_,1))
acc = tf.reduce_mean(tf.cast(correct_prediction, tf.float32))
- 誤差関数を変更
多クラス識別(分類)問題
→多クラス用クロスエントロピー(softmax_cross_entropy_with_logits)
3. 学習実行
# (2) バッチ型確率的勾配降下法でパラメータ更新
for i in range(10000):
    # 訓練データから100サンプルをランダムに取得
    batch_xs, batch_ys = mnist.train.next_batch(100)
    # 学習
    _, l = sess.run([train_step, loss], feed_dict={x: batch_xs, y_: batch_ys})
    if (i + 1) % 1000 == 0:
        print "step=%3d, loss=%.2f" % (i + 1, l)
- 大規模なデータで学習する時の工夫
各ステップで、100個の訓練データをランダムに取り出して学習 (確率的勾配降下法)
→速く学習が進む
参考: 学習結果

4. 予測
# (1) テスト用データを1000サンプル取得
new_x = mnist.test.images[0:1000]
new_y_ = mnist.test.labels[0:1000]

# (2) 予測と性能評価
accuracy, new_y = sess.run([acc, y], feed_dict={x:new_x , y_:new_y_ })
print "Accuracy (for test data): %6.2f%%" % accuracy
print "True Label:", np.argmax(new_y_[0:15,], 1)
print "Est Label:", np.argmax(new_y[0:15, ], 1)
ここはこれまでと同様
【実行結果例】
Accuracy(test data): 80.0%
True Label: [7 2 1 0 4 1 4 9 5 9 0 6 9 0 1]
Est Label: [7 2 1 0 9 1 4 9 2 9 0 6 9 0 1]
最終ソースコード
# coding: utf-8
import numpy as np
import tensorflow as tf
from tensorflow.examples.tutorials.mnist import input_data

# MNISTデータの取得
mnist = input_data.read_data_sets("MNIST_data/", one_hot=True)

# 1. 学習したいモデルを記述する
# 入力変数と出力変数のプレースホルダを生成
x = tf.placeholder(tf.float32, [None, 784])
y_ = tf.placeholder(tf.float32, [None, 10])
# モデルパラメータ(入力層:784ノード, 隠れ層:100ノード, 出力層:10ノード)
W1 = tf.Variable(tf.truncated_normal([784, 100]))
b1 = tf.Variable(tf.zeros([100]))
W2 = tf.Variable(tf.truncated_normal([100, 10]))
b2 = tf.Variable(tf.zeros([10]))
# モデル式
h = tf.sigmoid(tf.matmul(x, W1) + b1) # 入力層->隠れ層
u = tf.matmul(h, W2) + b2             # 隠れ層->出力層 (ロジット)
y = tf.nn.softmax(u)                  # 隠れ層->出力層 (ソフトマックス後)

# 2. 学習やテストに必要な関数を定義する
# 誤差関数(loss)
loss = tf.reduce_mean(tf.nn.softmax_cross_entropy_with_logits(u, y_))
# 最適化手段(最急降下法)
train_step = tf.train.GradientDescentOptimizer(0.01).minimize(loss)
# 正答率(学習には用いない)
correct_prediction = tf.equal(tf.argmax(y,1), tf.argmax(y_,1))
acc = tf.reduce_mean(tf.cast(correct_prediction, tf.float32))

# 3. 実際に学習処理を実行する
# (1) セッションを準備し,変数を初期化
sess = tf.Session()
init = tf.initialize_all_variables()
sess.run(init)

# (2) バッチ型確率的勾配降下法でパラメータ更新
for i in range(10000):
    # 訓練データから100サンプルをランダムに取得
    batch_xs, batch_ys = mnist.train.next_batch(100)
    # 学習
    _, l = sess.run([train_step, loss], feed_dict={x: batch_xs, y_: batch_ys})
    if (i + 1) % 1000 == 0:
        print("step=%3d, loss=%.2f" % (i + 1, l))

# 4. テスト用データに対して予測し,性能を確認
# (1) テスト用データを1000サンプル取得
new_x = mnist.test.images[0:1000]
new_y_ = mnist.test.labels[0:1000]

# (2) 予測と性能評価
accuracy, new_y = sess.run([acc, y], feed_dict={x:new_x , y_:new_y_ })
print("Accuracy (for test data): %6.2f%%" % accuracy)
print("True Label:", np.argmax(new_y_[0:15,], 1))
print("Est Label:", np.argmax(new_y[0:15, ], 1))

# 5. 後片付け
# セッションを閉じる
sess.close()
最終結果
Extracting MNIST_data/train-images-idx3-ubyte.gz
Extracting MNIST_data/train-labels-idx1-ubyte.gz
Extracting MNIST_data/t10k-images-idx3-ubyte.gz
Extracting MNIST_data/t10k-labels-idx1-ubyte.gz
step=1000, loss=2.03
step=2000, loss=1.43
step=3000, loss=0.90
step=4000, loss=0.84
step=5000, loss=1.04
step=6000, loss=0.76
step=7000, loss=0.63
step=8000, loss=0.66
step=9000, loss=0.48
step=10000, loss=0.77
Accuracy (for test data):   0.79%
True Label: [7 2 1 0 4 1 4 9 5 9 0 6 9 0 1]
Est Label: [7 2 1 0 4 1 4 4 6 7 0 6 9 0 1]
チュートリアル(MNISTビギナー編)
チュートリアルのMNIST For ML Beginners用の本来のソースリストは使わず、今回は、株式会社ブレインパッドの技術エントリーTensorFlowを遊び倒す! 1-1. MNIST For ML Beginnersのソースリストを動くように変更したものを使います。
※チュートリアルは2015年11月時点の記事を参考にしても、ディレクトリ配置が変わってしまったようなので注意が必要です。
tensorflow/g3doc/tutorials/mnist/ → tensorflow/examples/tutorials/mnist/
#変更箇所
import input_data  → from tensorflow.examples.tutorials.mnist import input_data
tf.device("/gpu:1") → tf.device("/cpu:0")
print → print()
ソースリスト
# coding: utf-8
import tensorflow as tf
from tensorflow.examples.tutorials.mnist import input_data


def main():
    # mnistのダウンロード
    mnist = input_data.read_data_sets("MNIST_data/", one_hot=True)

    # 複数GPUがあるので指定
    with tf.device("/cpu:0"):
        # n * 784 の可変2階テンソル
        x = tf.placeholder("float", [None, 784])

        # 重み行列とバイアスの宣言
        W = tf.Variable(tf.zeros([784, 10]))
        b = tf.Variable(tf.zeros([10]))

        # ソフトマックス層を定義
        y = tf.nn.softmax(tf.matmul(x, W) + b)

        # 正解用2階テンソルを用意
        y_ = tf.placeholder("float", [None, 10])

        # 誤差関数の交差エントロピー誤差関数を用意
        cross_entropy = -tf.reduce_sum(y_*tf.log(y))

        # 学習方法を定義 0.01は学習率
        train_step = tf.train.GradientDescentOptimizer(0.01).minimize(cross_entropy)

    # 変数の初期化 ここでGPUにメモリ確保か
    init = tf.initialize_all_variables()
    sess = tf.Session()
    sess.run(init)

    # 1に一番近いインデックス(予測)が正解とあっているか検証し、その平均
    correct_prediction = tf.equal(tf.argmax(y, 1), tf.argmax(y_, 1))
    accuracy = tf.reduce_mean(tf.cast(correct_prediction, "float"))

    # 学習開始
    for i in range(1000):
        batch_xs, batch_ys = mnist.train.next_batch(100)
        sess.run(train_step, feed_dict={x: batch_xs, y_: batch_ys})
        #print(sess.run(accuracy, feed_dict={x: batch_xs, y_: batch_ys}))


    print(sess.run(accuracy, feed_dict={x: mnist.test.images, y_: mnist.test.labels}))

if __name__ == "__main__":
    main()
実行結果
Successfully downloaded train-images-idx3-ubyte.gz 9912422 bytes.
Extracting MNIST_data/train-images-idx3-ubyte.gz
Successfully downloaded train-labels-idx1-ubyte.gz 28881 bytes.
Extracting MNIST_data/train-labels-idx1-ubyte.gz
Successfully downloaded t10k-images-idx3-ubyte.gz 1648877 bytes.
Extracting MNIST_data/t10k-images-idx3-ubyte.gz
Successfully downloaded t10k-labels-idx1-ubyte.gz 4542 bytes.
Extracting MNIST_data/t10k-labels-idx1-ubyte.gz
0.9139
参照
- TensorFlow MNIST For ML Beginners 翻訳
- TensorFlow Tutorialの数学的背景 − MNIST For ML Beginners(その1)- めもめも
- TensorFlow Tutorialの数学的背景 − MNIST For ML Beginners(その2)- めもめも
チュートリアル(MNISTエキスパート編)
チュートリアルのMNIST For ML Beginners用の本来のソースリストは使わず、株式会社ブレインパッドの技術エントリーTensorFlowを遊び倒す! 2-1. MNIST For Expertsのソースリストを動くように変更したものを使います。
#変更箇所
import input_data  → from tensorflow.examples.tutorials.mnist import input_data
tf.device("/gpu:1") → tf.device("/cpu:0")
strides=[1, 1, 1, 1], # 真ん中2つが縦横のストライド → コメント移動
strides=[1, 2, 2, 1], # 真ん中2つが縦横のストライド → コメント移動
print → print()
ソースリスト
# coding: utf-8
import tensorflow as tf
from tensorflow.examples.tutorials.mnist import input_data

def weight_variable(shape):
    """適度にノイズを含んだ(対称性の除去と勾配ゼロ防止のため)重み行列作成関数
    """

    initial = tf.truncated_normal(shape, stddev=0.1)
    return tf.Variable(initial)

def bias_variable(shape):
    """バイアス行列作成関数
    """
    initial = tf.constant(0.1, shape=shape)
    return tf.Variable(initial)

def conv2d(x, W):
    """2次元畳み込み関数
       strides 真ん中2つが縦横のストライド
    """
    return tf.nn.conv2d(x,
                        W,
                        strides=[1, 1, 1, 1],
                        padding='SAME')

def max_pool_2x2(x):
    """2x2マックスプーリング関数
       strides 真ん中2つが縦横のストライド
    """
    return tf.nn.max_pool(x,
                          ksize=[1, 2, 2, 1],
                          strides=[1, 2, 2, 1],
                          padding='SAME')

def main():
    # mnistのダウンロード
    mnist = input_data.read_data_sets("MNIST_data/", one_hot=True)

    sess = tf.InteractiveSession()
    with tf.device("/cpu:0"):
        # データ用可変2階テンソルを用意
        x = tf.placeholder("float", shape=[None, 784])
        # 正解用可変2階テンソルを用意
        y_ = tf.placeholder("float", shape=[None, 10])

        # 画像をリシェイプ 第2引数は画像数(-1は元サイズを保存するように自動計算)、縦x横、チャネル
        x_image = tf.reshape(x, [-1, 28, 28, 1])

        ### 1層目 畳み込み層

        # 畳み込み層のフィルタ重み、引数はパッチサイズ縦、パッチサイズ横、入力チャネル数、出力チャネル数
        # 5x5フィルタで32チャネルを出力(入力は白黒画像なので1チャンネル)
        W_conv1 = weight_variable([5, 5, 1, 32])
        # 畳み込み層のバイアス
        b_conv1 = bias_variable([32])
        # 活性化関数ReLUでの畳み込み層を構築
        h_conv1 = tf.nn.relu(conv2d(x_image, W_conv1) + b_conv1)

        ### 2層目 プーリング層

        # 2x2のマックスプーリング層を構築
        h_pool1 = max_pool_2x2(h_conv1)

        ### 3層目 畳み込み層

        # パッチサイズ縦、パッチサイズ横、入力チャネル、出力チャネル
        # 5x5フィルタで64チャネルを出力
        W_conv2 = weight_variable([5, 5, 32, 64])
        b_conv2 = bias_variable([64])
        h_conv2 = tf.nn.relu(conv2d(h_pool1, W_conv2) + b_conv2)

        ### 4層目 プーリング層
        h_pool2 = max_pool_2x2(h_conv2)

        ### 5層目 全結合層

        # オリジナル画像が28x28で、今回畳み込みでpadding='SAME'を指定しているため
        # プーリングでのみ画像サイズが変わる。2x2プーリングで2x2でストライドも2x2なので
        # 縦横ともに各層で半減する。そのため、28 / 2 / 2 = 7が現在の画像サイズ

        # 全結合層にするために、1階テンソルに変形。画像サイズ縦と画像サイズ横とチャネル数の積の次元
        # 出力は1024(この辺は決めです) あとはSoftmax Regressionと同じ
        W_fc1 = weight_variable([7 * 7 * 64, 1024])
        b_fc1 = bias_variable([1024])

        h_pool2_flat = tf.reshape(h_pool2, [-1, 7 * 7 * 64])
        h_fc1 = tf.nn.relu(tf.matmul(h_pool2_flat, W_fc1) + b_fc1)

        # ドロップアウトを指定
        keep_prob = tf.placeholder("float")
        h_fc1_drop = tf.nn.dropout(h_fc1, keep_prob)

        ### 6層目 Softmax Regression層

        W_fc2 = weight_variable([1024, 10])
        b_fc2 = bias_variable([10])

        y_conv = tf.nn.softmax(tf.matmul(h_fc1_drop, W_fc2) + b_fc2)

    # 評価系の関数を用意
    cross_entropy = -tf.reduce_sum(y_*tf.log(y_conv))
    train_step = tf.train.AdamOptimizer(1e-4).minimize(cross_entropy)
    correct_prediction = tf.equal(tf.argmax(y_conv,1), tf.argmax(y_,1))
    accuracy = tf.reduce_mean(tf.cast(correct_prediction, "float"))
    sess.run(tf.initialize_all_variables())

    for i in range(20000):
        batch = mnist.train.next_batch(50)
        if i%100 == 0:
            train_accuracy = accuracy.eval(feed_dict={x:batch[0],
                                                      y_: batch[1],
                                                      keep_prob: 1.0})
            print("step %d, training accuracy %g"%(i, train_accuracy))
        train_step.run(feed_dict={x: batch[0], y_: batch[1], keep_prob: 0.5})

    print("test accuracy %g"%accuracy.eval(feed_dict={
        x: mnist.test.images, y_: mnist.test.labels, keep_prob: 1.0}))

if __name__ == "__main__":
    main()
実行結果 CPUのみとしたため、3時間程度かかりました。
自PCは「Intel Core i7-4700MQ 2.4GHz」です。
akiraakさんのブログには「Intel Core i7-6700K 4GHz」で30分、「NVIDIA TITAN X」のGPU実行では1分30秒に短縮されますとのこと。速いは正義!
Extracting MNIST_data/train-images-idx3-ubyte.gz
Extracting MNIST_data/train-labels-idx1-ubyte.gz
Extracting MNIST_data/t10k-images-idx3-ubyte.gz
Extracting MNIST_data/t10k-labels-idx1-ubyte.gz
step 0, training accuracy 0.1
step 100, training accuracy 0.78
step 200, training accuracy 0.94
step 300, training accuracy 0.88

(中略)

step 19800, training accuracy 1
step 19900, training accuracy 1
test accuracy 0.9926
実行前の注意点(2016/05/28追記)
Docker上で実行した場合、"The Kernel appears to have died."という表示とともに計算が停止したとのコメントを頂きました。
TensorFlowコトハジメ Automatic Colorization(白黒画像の自動彩色)の記事内のメモリ不足を参考に、VirtualBoxのdefaultを4GByteに、docker runに「-m 4g」のオプションを付けて実行してください。
実行後にfreeコマンドでメモリ状況を参照したところ使用メモリが「1138420」となっていました。defaultマシンの初期メモリは1GByteなのでメモリが足りなかったのでしょう。
             total       used       free     shared    buffers     cached
Mem:       4045692    1138420    2907272      91824      10164     108692
-/+ buffers/cache:    1019564    3026128
Swap:      1946364     244772    1701592